


Want to record your screen on Windows 11 without paying for expensive software? Don’t worry, I got you.
After using Windows 11 for years, I’ve learned that many useful features are already built into the operating system. Most users start searching for third-party screen recorders without realizing Windows 11 already offers free ways to record your screen.
I discovered this during an online class when my professor asked me to save lecture recordings on my Dell XPS 13 Plus laptop. At first, I was overwhelmed by the premium software available for recordings.
However, after testing different methods, I found that tools like Xbox Game Bar, Snipping Tool, and ShareX can record your screen for free without watermarks. Now, let’s explore the best methods step by step.
Methods to Record Screen in Windows 11 (Step by Step)
You can record your screen in Windows 11 for free using these methods:
- Snipping Tool: Open the app, select the area to record, start recording, and save your video.
- Xbox Game Bar: Press Windows + G, use the Capture widget to record an app or game, and your recording is saved automatically.
- ShareX: Install ShareX, select screen recording from the Capture menu, choose the area, and save your video after recording.
All these tools are free and do not add watermarks.
Method 1: Record Screen Using Snipping Tool
Snipping Tool is one of the easiest free ways to record your screen on Windows 11. Since it comes pre-installed, you do not need to download any third-party software.
It works well for recording online classes, tutorials, presentations, and browser activities without watermarks.
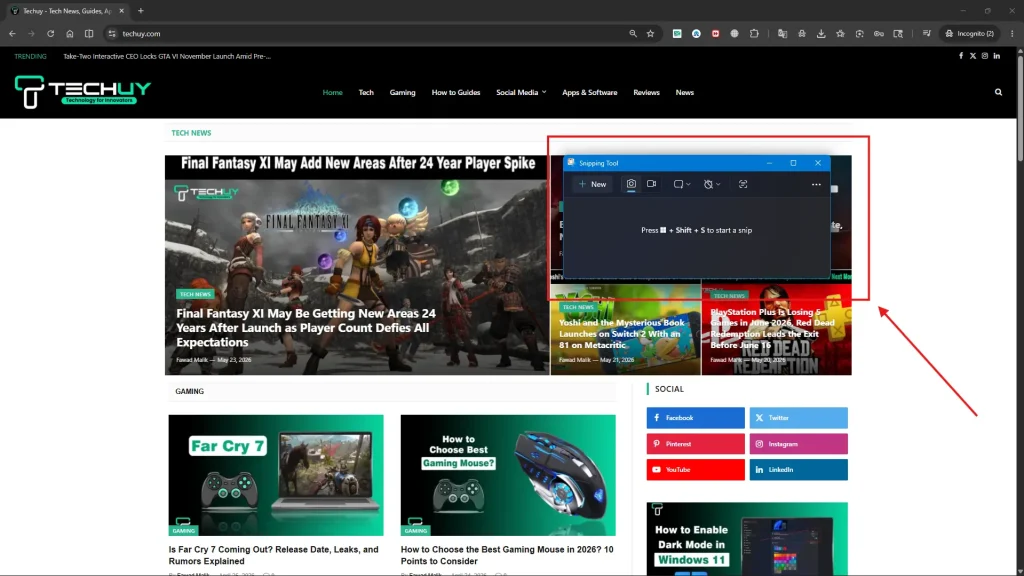
- Step 1: Open the Start Menu, search for Snipping Tool, and launch the app. (Tip: You can also press Windows Key + Shift + R to open the recording tool directly.)
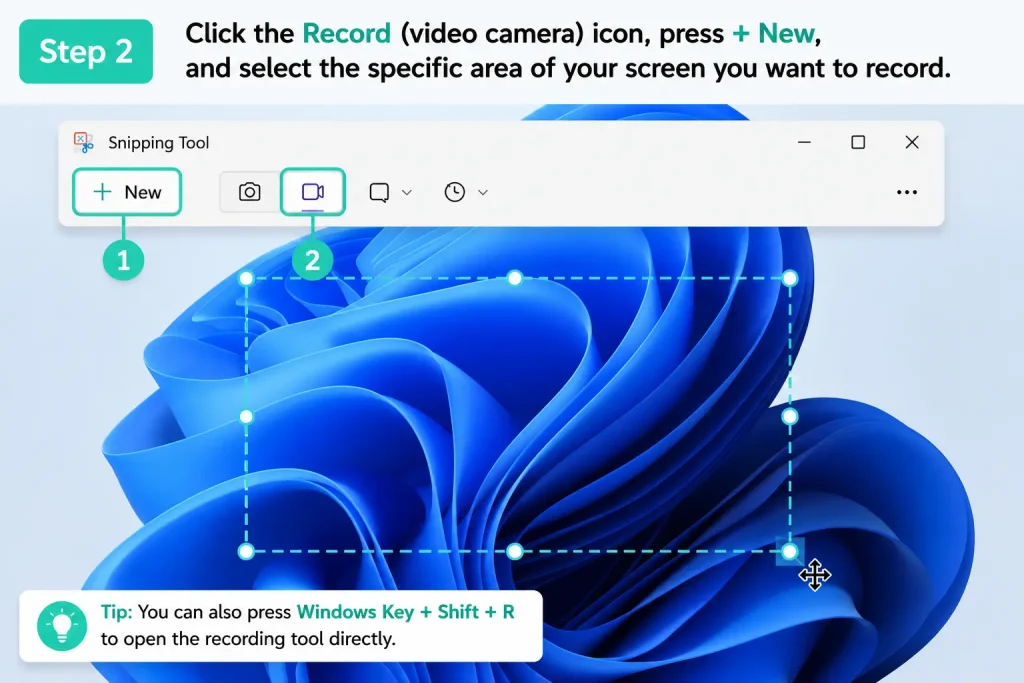
- Step 2: Click the Record (video camera) icon, press + New, and select the specific area of your screen you want to record.
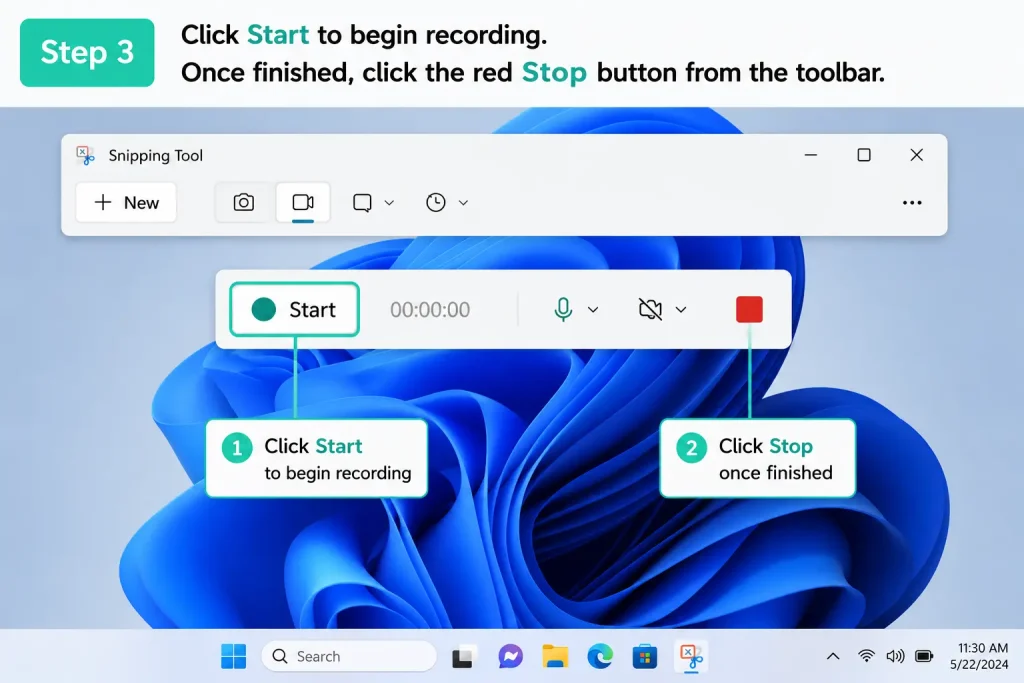
- Step 3: Click Start to begin recording. Once finished, click the red Stop button from the toolbar.
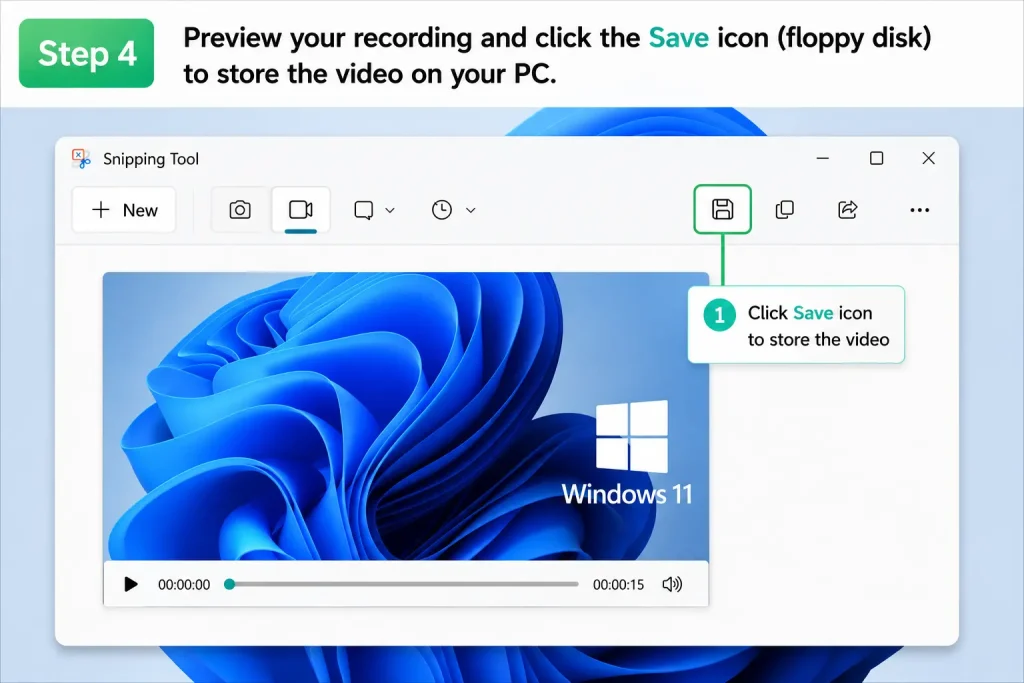
- Step 4: Preview your recording and click the Save icon (floppy disk) to store the video on your PC.
Note: Snipping Tool supports basic screen recording, but audio recording features may be limited depending on your Windows 11 version.
Method 2: Record Screen Using Xbox Game Bar
Xbox Game Bar is another free built-in tool in Windows 11 that lets you record your screen without installing additional software.
This tool is designed to record specific applications or PC games. It cannot record the Windows Desktop, File Explorer, or multiple windows at once. If you minimize the app you are recording, the session will automatically end.
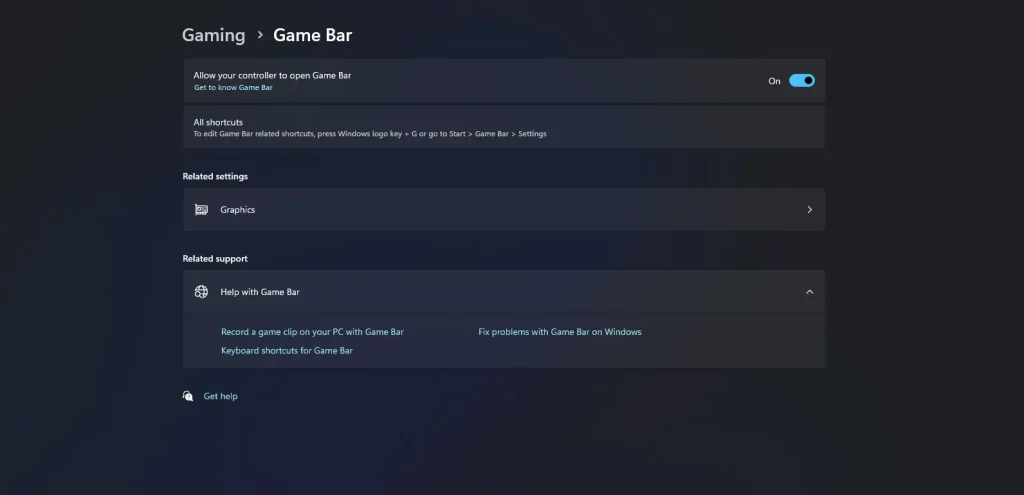
- Step 1: Open Settings > Gaming > Xbox Game Bar and make sure it is enabled on your PC.
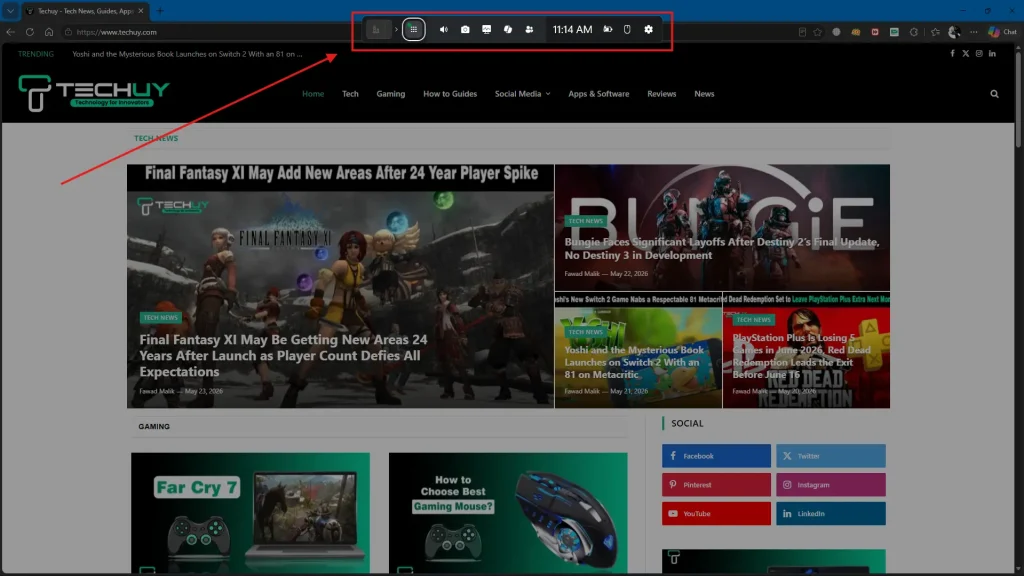
- Step 2: Open the specific app, game, or browser window you want to record, then press Windows + G to launch the Xbox Game Bar.
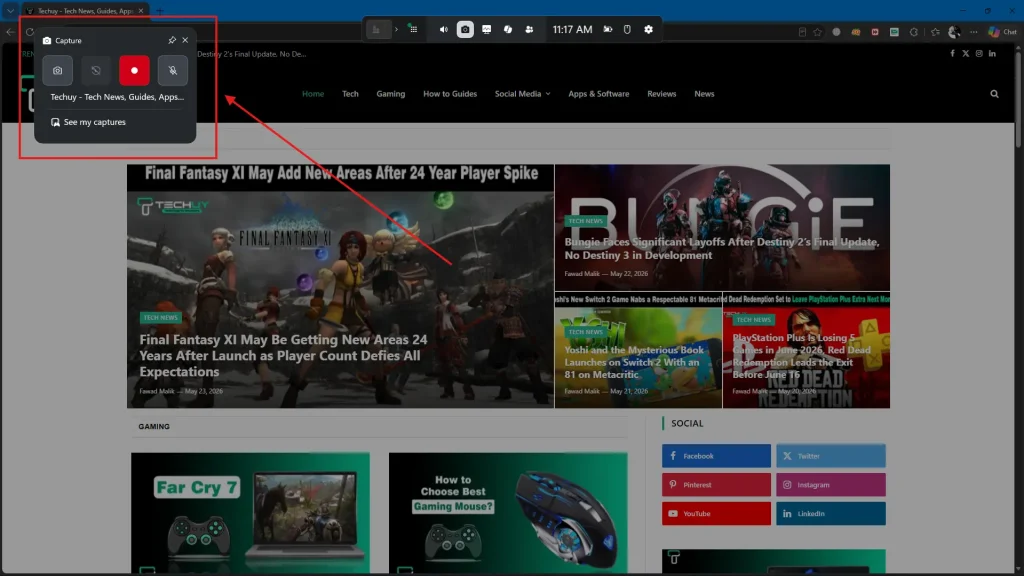
- Step 3: Click the Capture widget icon from the top bar and press the Record button (the circle) to start screen recording.
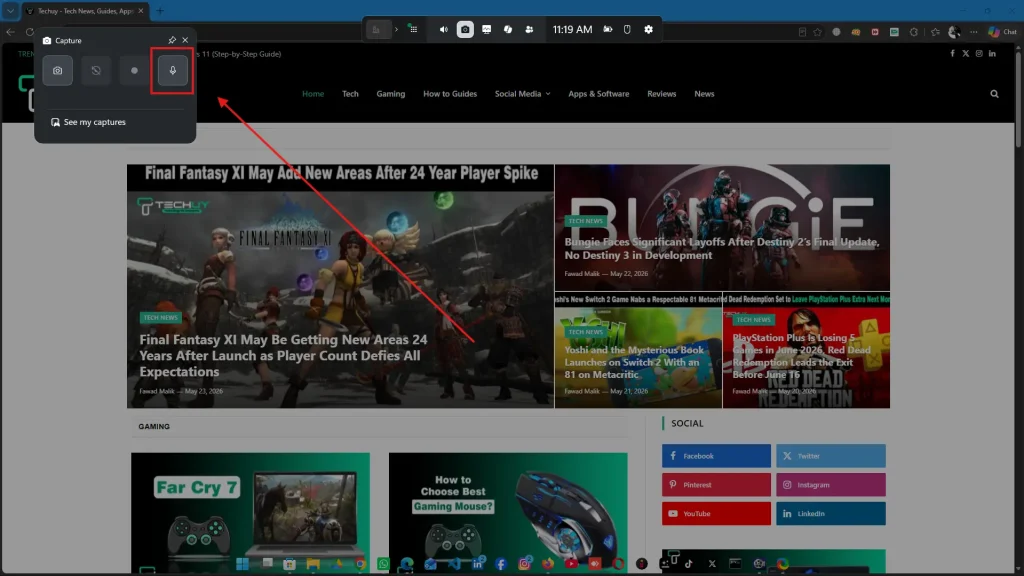
- Step 4: To record your voice, enable the microphone option from the Capture widget before or during the recording.
- Step 5: Once finished, click the Stop button on the floating menu or press Windows + Alt + R to end the recording.
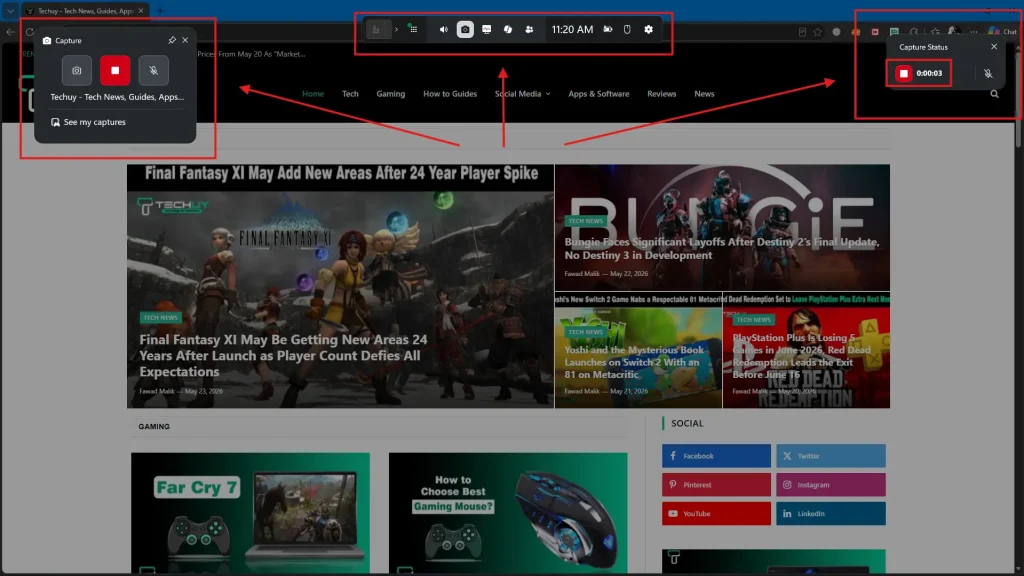
- Step 6: Your recordings are automatically saved in the Videos > Captures folder on your PC.
Tip: You can also record microphone and system audio by enabling the Mic option from the Capture widget before starting the recording.
Method 3: Record Screen Using ShareX
ShareX is a lightweight, free tool that allows you to record your screen, capture screenshots, and share files easily on Windows 11.
It is a good option for users who want more recording features than the built-in Windows tools without using heavy software.
- Step 1: Download and install ShareX on your Windows 11 PC.
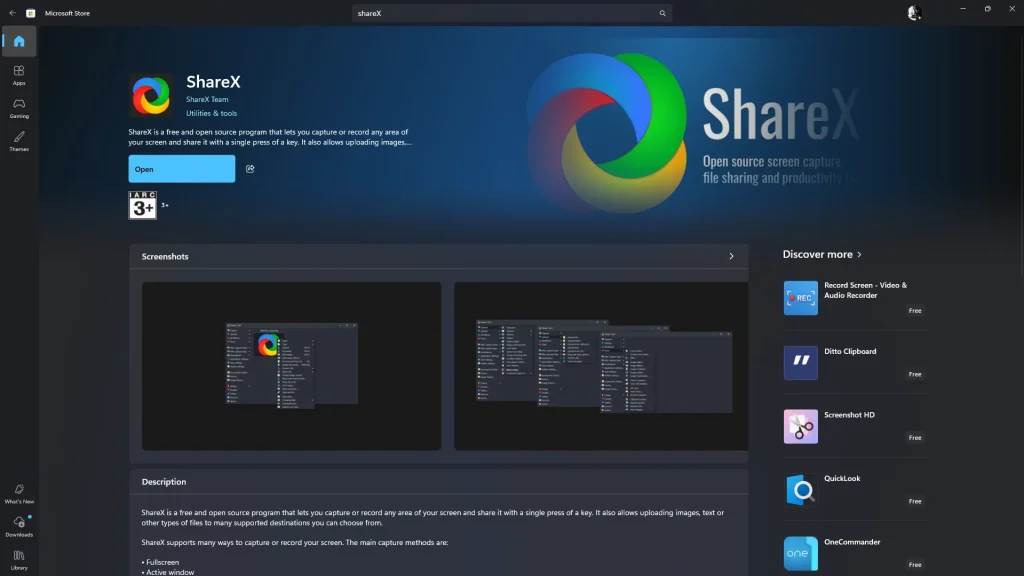
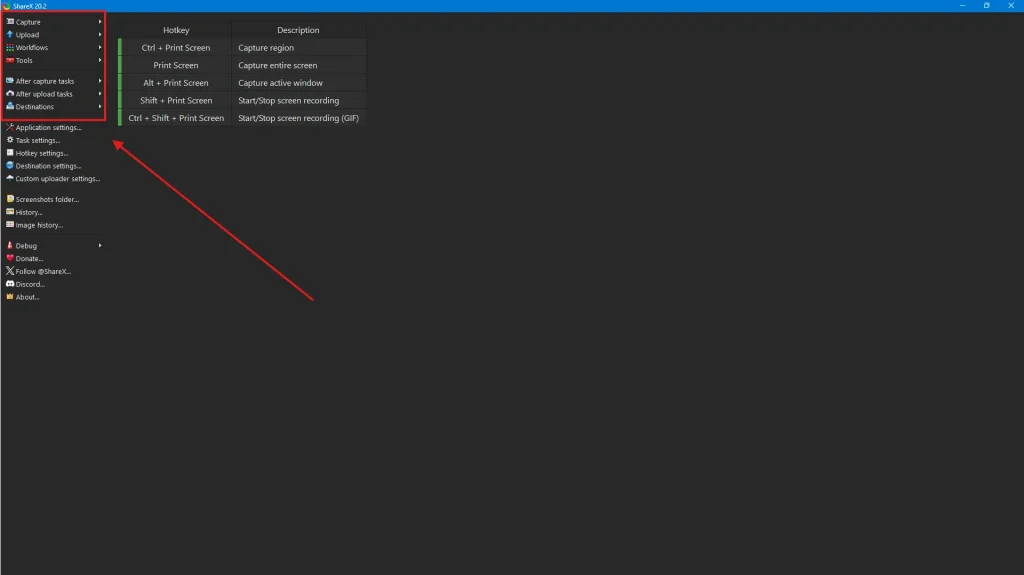
- Step 2: Open ShareX and click Capture from the left menu.
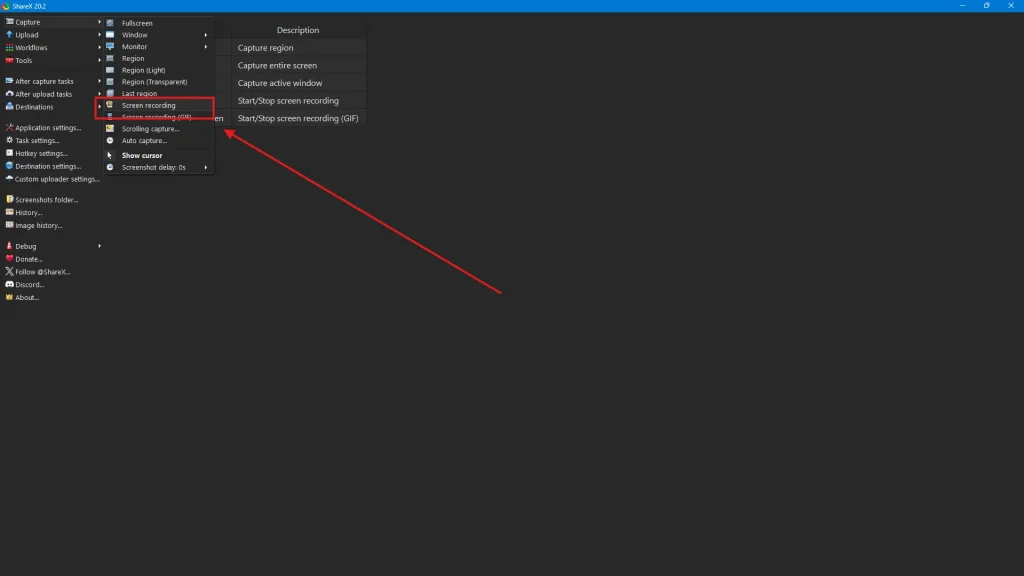
- Step 3: Select Screen Recording and choose the area you want to record. (Note: On your very first run, ShareX may show a pop-up asking to download a small, free file called FFmpeg to process videos. Click yes to automatically set it up.)
- Step 4: Click Start (or use the crosshairs to select the region) to begin recording your screen activity.
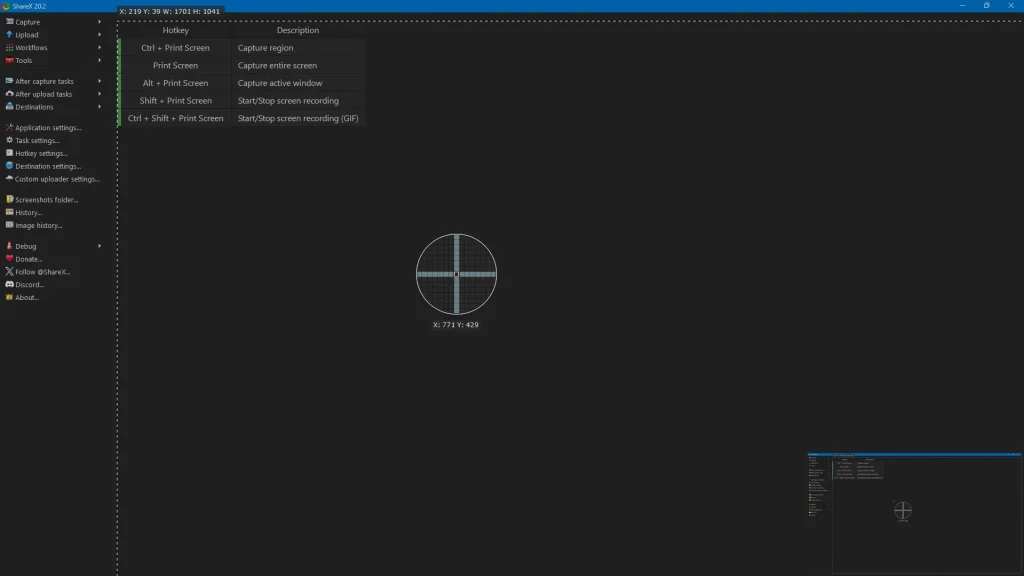
- Step 5: Once finished, click the red Stop button on the bottom toolbar to automatically save the video file on your PC.
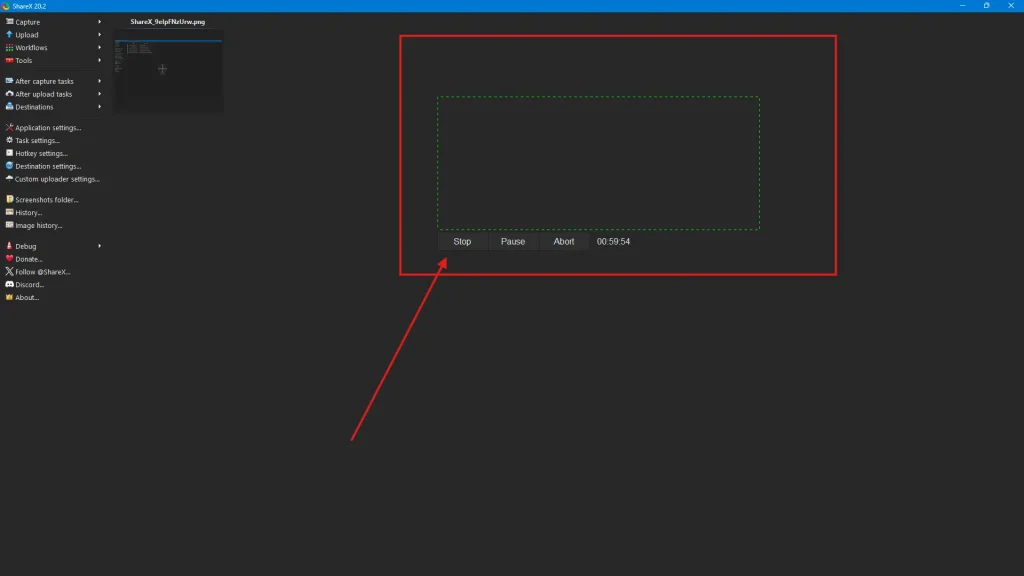
Tip: ShareX can record both the microphone and system audio after configuring the audio source settings.
Common Screen Recording Problems and Fixes
Even though screen recording on Windows 11 is simple, you may still face some common issues while using built-in or third-party tools.
Xbox Game Bar Not Working
If the Xbox Game Bar is not opening or recording:
- Make sure Xbox Game Bar is enabled from Settings > Gaming.
- Update Windows 11 to the latest version.
- Restart your PC and try again.
Snipping Tool Recording Option Missing
If the recording feature is not available in Snipping Tool:
- Update the Snipping Tool from the Microsoft Store.
- Install the latest Windows 11 updates.
- Restart the app after updating.
Black Screen While Recording
A black screen usually appears because of graphics or app permission issues.
- Run the recording tool as an administrator.
- Update your graphics drivers.
- Disable hardware acceleration in the browser or app.
No Audio in Recording
If your screen recording has no sound:
- Check if the microphone is muted.
- Enable microphone permissions in Windows settings.
- Verify that system audio is enabled in the recording software.
Laggy Screen Recording
If your recording looks slow or choppy:
- Close unnecessary background apps.
- Lower the recording resolution if needed.
Tips for Better Screen Recordings
A few simple adjustments can improve the quality of your screen recordings and make them look more professional.
Use Keyboard Shortcuts
Keyboard shortcuts help you start or stop recordings quickly without interrupting your workflow.
- Windows + G opens the Xbox Game Bar.
- Windows + Alt + R starts or stops recording in Xbox Game Bar.
Record in HD Quality
Use at least 1080p resolution for clearer videos, especially for tutorials, gameplay, and presentations.
Use a Good Microphone
Clear audio makes your recordings more professional and easier to understand. Even a basic external microphone can improve sound quality significantly.
Close Background Apps
Closing unnecessary applications reduces lag and helps screen recording software run more smoothly.
Save Videos in MP4 Format
MP4 is the most widely supported video format and works well for YouTube, presentations, online sharing, and video editing.
People Also Ask
Some streaming platforms use DRM protection, which may cause a black screen while recording. This mainly happens in browsers with hardware acceleration enabled.
Yes, screen recording can use CPU, GPU, and RAM resources, especially when recording in high resolution or using advanced software like OBS Studio.
Snipping Tool and Xbox Game Bar are better options for low-end PCs because they are lightweight and built into Windows 11.
Yes, advanced tools like OBS Studio support recording multiple monitors and custom screen layouts.
MP4 is the best format for most users because it offers good video quality, smaller file sizes, and wide compatibility across devices and platforms.
Final Thoughts on Recording Screen on Windows 11
Recording your screen on Windows 11 is much easier than most people think. Whether you use Snipping Tool for quick recordings, Xbox Game Bar for gameplay, or ShareX for professional-quality videos, each tool offers a free way to capture your screen without watermarks.
Personally, I prefer built-in tools for quick tasks because they are simple and lightweight, while ShareX works better for advanced recordings and content creation.
