


If your Windows 11 computer keeps showing low-storage warnings, temporary files may be the reason.
Many users assume that deleting large files or uninstalling apps is enough to free up space. However, Windows also creates temporary files for updates, installations, web browsing, watching YouTube, and other background tasks.
These files often remain on your PC after they’re no longer needed. Over time, temporary files can take up several gigabytes of storage and contribute to space issues, which also slow down the system.
Now I will show you how to delete temporary files in Windows 11 to free up storage without installing any premium cleanup software.
What Are Temporary Files, and Is It Safe to Delete Them?
Temporary files are files that Windows 11 and installed applications create for short-term tasks, including:
- Windows updates
- Software installations
- Web browsing
- App caching
- Error reporting
These files help Windows and applications function properly, but they often remain on your PC after they’re no longer needed. Over time, they can consume valuable storage space.
Is It Safe to Delete Temporary Files?
Yes, in most cases, temporary files are safe to delete because Windows 11 and applications can recreate them when needed.
However, avoid deleting temporary files if:
- A Windows update is currently installing
- A software installation is in progress
- A file is actively being used by an application
If Windows detects a file that’s in use, it will usually display a warning and allow you to skip it.
Deleting unnecessary temporary files can help free up storage space and reduce system clutter without affecting the normal operation of your Windows 11 computer.
Methods to Delete Temporary Files in Windows 11 (Step by Step)
You can delete temporary files in Windows 11 using these built-in methods:
- Storage Settings: Open Storage Settings, review temporary files, select the files you want to remove, and start the cleanup.
- %temp% Folder: Open the temporary files folder using the Run dialog, select all files, and delete the unnecessary items manually.
Both methods are free, built into Windows 11, and do not require any third-party cleanup software.
Method 1: Delete Temporary Files Using Storage Settings
Storage Settings is the easiest way to remove temporary files in Windows 11. It lets you review the files Windows identifies as safe to delete and remove them in just a few clicks.
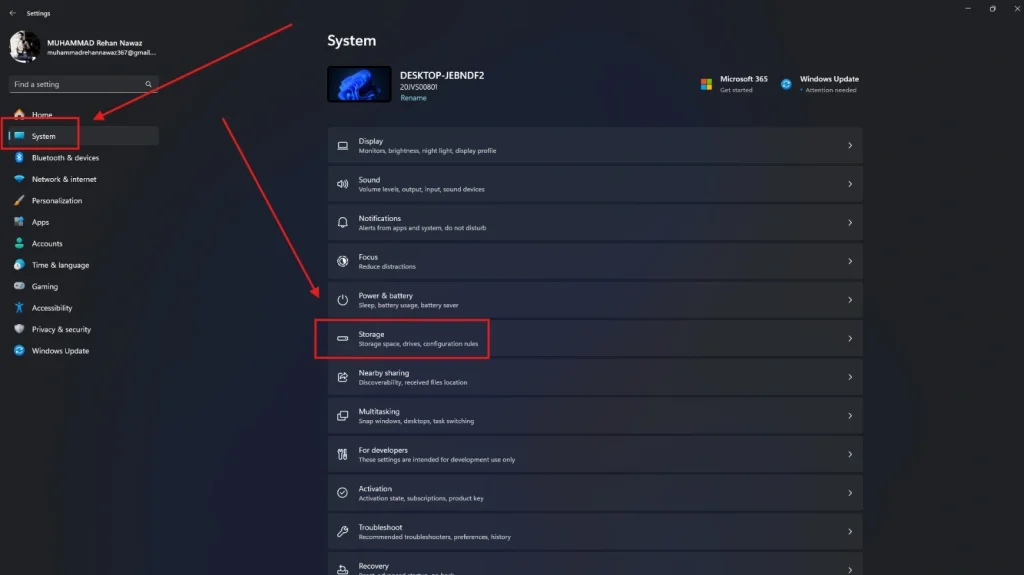
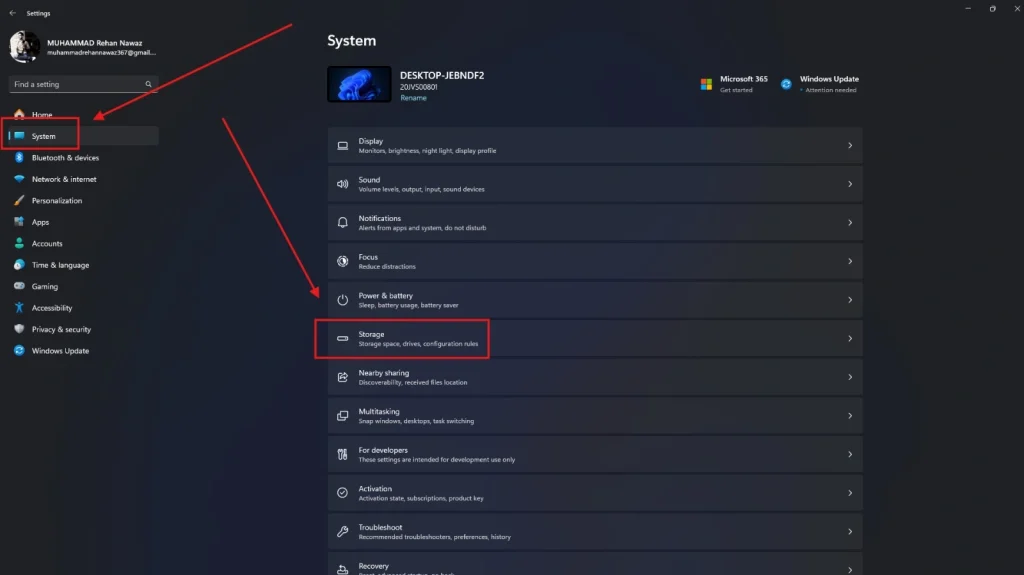
1: Press Windows + I to open Settings, then navigate to System > Storage.
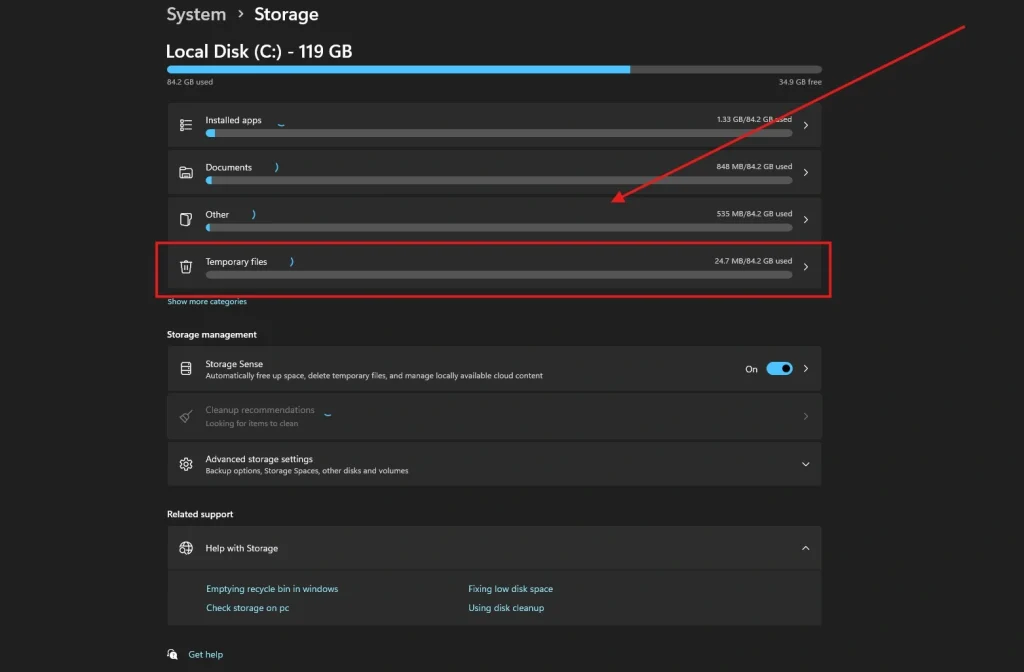
2: Under the Storage section, click Temporary files and wait for Windows to scan your computer.
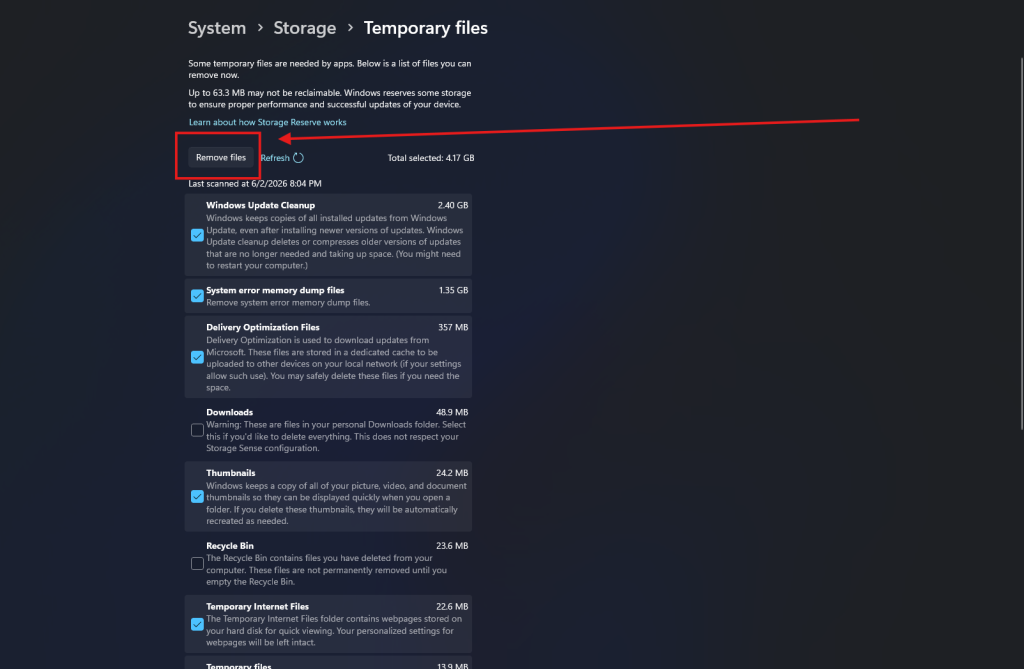
3: Review the available categories and check the items you want to delete. Common options include:
- Temporary files
- Delivery Optimization Files
- DirectX Shader Cache
- Temporary Internet Files
- Recycle Bin
Note: Review the Downloads category carefully before selecting it, as any files inside it will be permanently removed.
Step 4: Click Remove files and confirm the action when prompted. Windows 11 will begin deleting the selected temporary files and free up storage space on your PC.
Method 2: How to delete temp files in Windows 11 using Run?
The %temp% folder stores temporary files created by Windows and installed applications. Deleting these files manually can help recover additional storage space.
Step 1: Press Windows + R to open the Run dialog box.
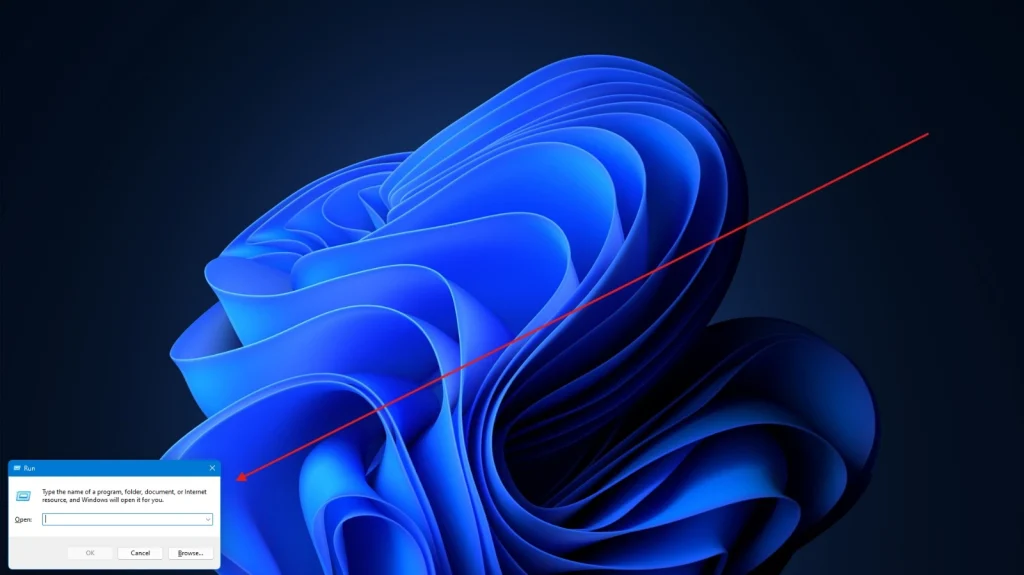
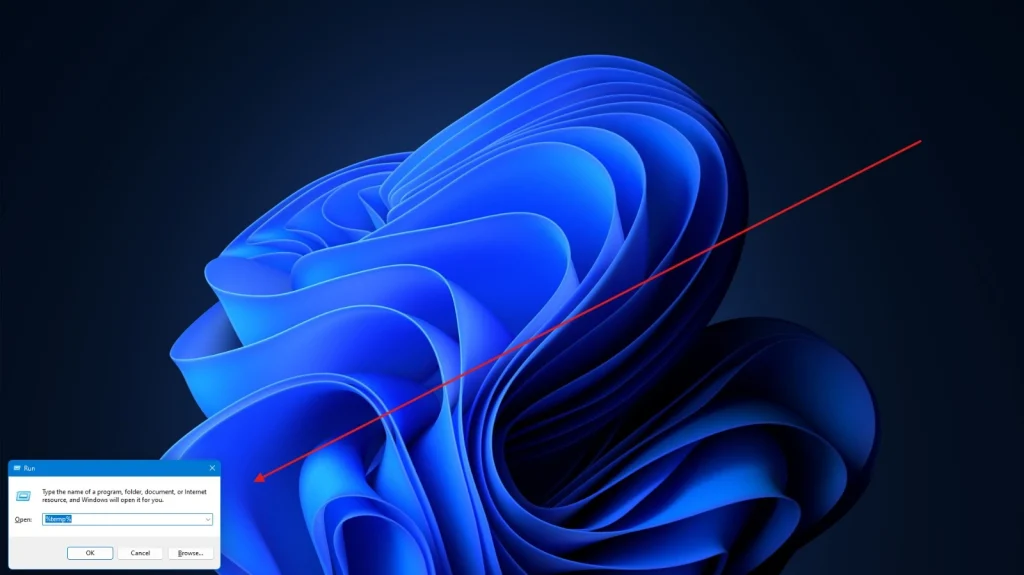
Step 2: Type %temp% and press Enter. This will open the Temp folder containing temporary files stored on your computer.
Step 3: Press Ctrl + A to select all files and folders inside the Temp directory.
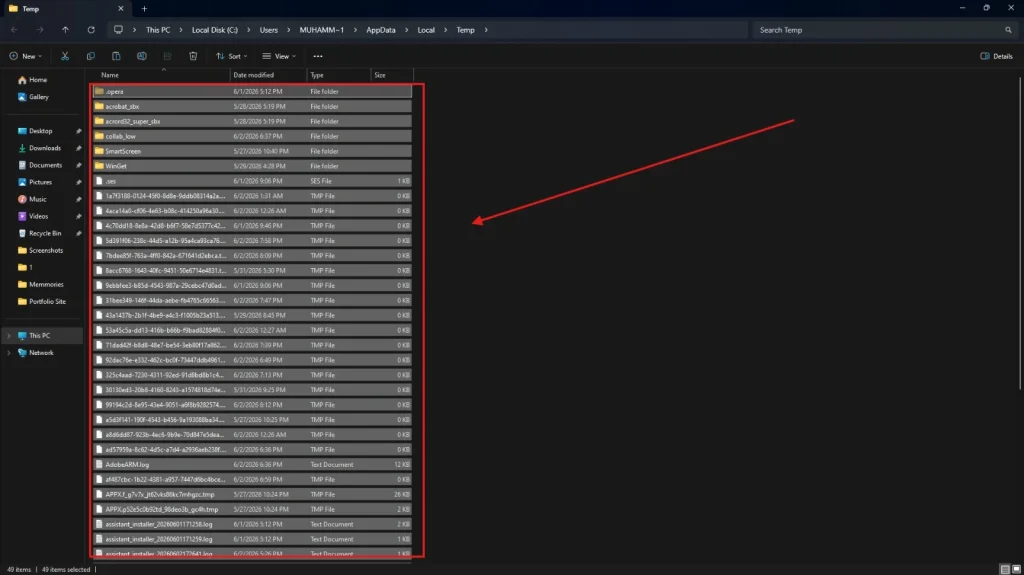
Step 4: Press Delete on your keyboard or right-click and select Delete. If Windows displays a message that some files are currently in use, click Skip and continue with the deletion process.
Tip: Restarting your computer before deleting files can help remove additional temporary files that may be locked by running applications.
What to Do If Temporary Files Won’t Delete?
In some cases, Windows 11 may prevent certain temporary files from being deleted because they’re currently being used by the system or another application.
Here are a few things you can try:
- Restart Your Computer: Restart your PC and try deleting the temporary files again. This closes background processes that may be using the files.
- Close Running Applications: Save your work and close any open programs before attempting the cleanup. Some applications, such as PC games and platforms like Stealthgram, keep temporary files active while running.
- Skip Files Currently in Use: If Windows displays a message that a File is in use, click Skip and continue deleting the remaining files. These files are usually removed automatically later when they’re no longer needed.
- Run the Cleanup Again Later: If a Windows update or software installation is in progress, wait until it finishes and then repeat the cleanup process.
Benefits of Deleting Temporary Files in Windows 11
Regularly removing temporary files can help keep your Windows 11 computer organized and free up unnecessary storage usage. Some benefits include:
- Free up disk space
- Reduce storage clutter
- Remove outdated temporary data
- Improve storage management
- Help maintain overall system performance
While deleting temporary files won’t dramatically speed up every PC, it can help prevent storage-related issues and keep Windows running efficiently.
People Also Ask
Yes, most temporary files can be safely deleted because Windows and applications can recreate them when needed. However, avoid deleting files during active Windows updates or software installations.
There’s no fixed schedule, but deleting temporary files every few weeks or whenever you’re running low on storage space is sufficient for most users.
Deleting temporary files can free up storage space and reduce clutter. While it may not dramatically improve performance on every PC, it can help resolve storage-related storage issues and keep Windows running smoothly.
Temporary files are automatically created by Windows 11 and installed applications during updates, browsing sessions, software installations, and other system tasks. This is normal behavior, which is why regular cleanup is recommended.
Deleting temporary files removes unnecessary data that is no longer needed. Your personal files, installed applications, and Windows settings remain unaffected.
You can delete temporary files using Command Prompt by opening CMD as an administrator and running commands that target the Temp folders. However, for most users, Storage Settings or the %temp% folder is a safer and easier option.
On macOS, temporary files can be removed by clearing cache folders, deleting unnecessary system files, or using the built-in storage management tools. The exact steps differ from Windows 11.
Yes, many temporary files stored in the AppData\Local\Temp folder can be safely deleted. If a file is currently in use, Windows will prevent its removal or prompt you to skip it.
The process is similar to Windows 11. You can remove temporary files through Settings > System > Storage > Temporary Files or by opening the %temp% folder and deleting its contents.
Yes, temporary files are generally safe to delete because they are created for short-term use. Windows and applications can recreate them whenever necessary.
Yes, periodically deleting temporary files can free up storage space, reduce clutter, and help maintain your computer. Regular cleanup is especially useful if you’re running low on disk space.
At the End, Should You Delete Temporary Files in Windows 11?
Temporary files are a normal part of Windows 11, but letting them accumulate can waste valuable storage space over time.
By using Storage Settings or clearing the %temp% folder, you can quickly remove unnecessary files without installing third-party cleanup tools.
In my experience, checking and deleting temporary files every few weeks is one of the simplest ways to keep storage organized and avoid low-space warnings.
A few minutes of cleanup can go a long way toward maintaining a cleaner and more efficient Windows 11 PC.
